Valheim Linux Dedicated Server on Ubuntu 22.04
Instructions to setup a Valheim dedicated server running on Ubuntu 22.04 as a standalone server (LAN/WAN) or using Crossplay on Valheim Version 0.211.11 as of the time of this writing.
Pre-Setup Considerations
– Read the Valheim Dedicated Server Manual
– Game Server Options
– Host Resources
– LAN & WAN Connections
Install Valheim Linux Dedicated Server on Ubuntu 22.04
1. Install steamcmd
2. Setup user to run the dedicated server
3. Install the Valheim systemd service
4. Start the Valheim systemd service
5. Check Valheim service status
6. Automatically start the dedicated server on system boot
Configure Valheim Linux Dedicated Server with Crossplay
Pre-Setup Considerations
Read the Valheim Dedicated Server Manual
The Valheim Dedicated Server Manual PDF (0.211.11) is provided with the game server files during the initial steamcmd execution. Much of the information in this page is referenced from the manual and can provide additional guidance for setting up the dedicated server.
Game Server Options
world – The world’s game files for the dedicated server are saved in a folder under the user for which the Valheim dedicated server is installed and running. When running the server, one of the options will be the -world and the relevant files will end up being called the value of world configuration option.
Example:
-world valinor – Specifies the world as valinor. The world files live in the linux user’s home directory.
ls -alrt ~/.config/unity3d/IronGate/Valheim/worlds_local/
-rw-rw-r-- 1valheimuservalheimuser43 Oct 29 11:45 valinor_backup_auto-20221029114552.fwl -rw-r--r-- 1valheimuservalheimuser4.3M Oct 29 12:47 valinor_backup_auto-20221029124734.db -rw-r--r-- 1valheimuservalheimuser43 Oct 29 13:47 valinor_backup_auto-20221029134737.fwl -rw-r--r-- 1valheimuservalheimuser4.3M Oct 29 14:47 valinor_backup_auto-20221029144740.db -rw-r--r-- 1valheimuservalheimuser4.3M Oct 29 14:47 valinor.db.old -rw-r--r-- 1valheimuservalheimuser43 Oct 29 14:47 valinor.fwl.old -rw-r--r-- 1valheimuservalheimuser4.3M Oct 29 15:17 valinor.db -rw-r--r-- 1valheimuservalheimuser43 Oct 29 15:17 valinor.fwl
port – The default port is 2345 and configurable. In our example, we will change the port to 3456 subsequently making the required ports to open for network communication 3456, 3457, and 3458. The UDP ports 3456 and 3457 will be listening when the Valheim server is running but the main port used when connecting directly to a host will be 3456.
Example:
-port 3456
sudo ss -an | grep 345
udp   UNCONN 0      0                                         0.0.0.0:3457               0.0.0.0:*
udp   UNCONN 0      0                                               *:3456                     *:*
name – The human name of the dedicated server. If the server is open to the community, this is the name that appears to users when they search to join available servers.
password – Password of the server.
Host & Network Resources
These are the system resources used during this example setup which would accommodate up to 10 players.
- CPU: 4core x 3.4 GHz
- RAM: 16 GB
- DISK: 60 GB (SSD)
- WAN TX: 20 Mbps
- WAN RX: 100 Mbps
Checking internet speeds can be done by installing the speedtest-cli package and running speedtest. Result will absolutely vary.
apt install speedtest-cli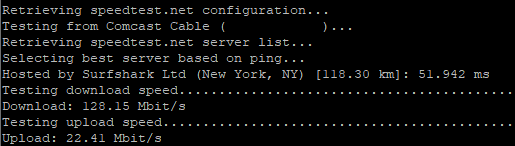 |  |
LAN & WAN Connections
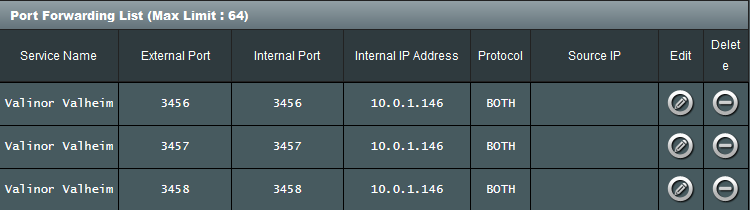
To allow client connections from outside the LAN, the incoming TCP/UDP connections on the game server port plus two more ports sequentially must be opened. Port forwarding settings are common on most modern routers and modems, but every device’s capability for port forwarding is different, access to certain network devices can be limited and technical familiarity of the network can vary.
Example:
A home router example could be an ASUS Wireless Router which has a web administration portal for setting port forwarding to internal hosts on the LAN.
Advanced -> WAN -> Virtual Server / Port Forwarding -> Add Profile
Allow Incoming TCP/UDP port 3456, 3457, 3458
Default -port 2456
Allow Incoming TCP/UDP port 2456, 2457, 2458
Crossplay
As noted in the manual:
If you’re using the Crossplay backend, data is transmitted via a relay server so you do not need to do Port Forwarding on your Router for the server to be accessible from outside of your local network. You can connect to a Crossplay server using the public IP address and port number, a join code or via the server list, however it’s not possible to connect using a local IP address or a loopback IP address.
“Valheim Dedicated Server” Instruction Manual (Steam) – 0.211.11
Install Valheim Linux Dedicated Server
1. Install steamcmd (reference)
The steamcmd command installs and updates the Valheim dedicated server files. Setting up the repository is a one-time action and must be done as root or by a user with sudo privileges.
sudo add-apt-repository -y multiverse
sudo apt install -y software-properties-common
sudo dpkg --add-architecture i386
sudo apt update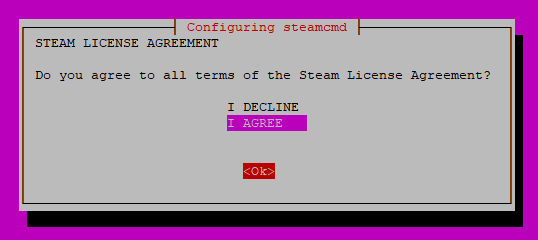
sudo apt install -y lib32gcc-s1 steamcmd libpulse0 libpulse-dev libatomic1 libc6NOTE: While installing steamcmd, a license agreement window will be displayed.
To navigate the license agreement prompt, press Tab to select “<OK>” and press Enter. An agreement selection prompt will be shown. Press the Down Arrow to move the selector to “I AGREE”, press Tab again to select “<OK>” and press Enter.
To verify the steamcmd command is available to use, type which steamcmd – it will be installed under /usr/games/steamcmd
$ which steamcmd
/usr/games/steamcmd
2. Setup user to run the dedicated server
It is recommended to run the Valheim server under a non-root user. Create new user to run the dedicated server binary. In this example, the user is called valheimuser
sudo adduser valheimuser --home /home/valheimuser --shell /bin/bash --gecos "" --quiet --disabled-password
(Optional) Set a password on the new user to allow SSH login
sudo passwd valheimuser
3. Install the Valheim systemd service
Create the file: /etc/systemd/system/valheim.service
[Unit]
Description=Valheim Dedicated Server
Wants=network.target
After=syslog.target network-online.target

[Service]
Type=simple
Restart=on-failure
RestartSec=10
User=valheimuser
EnvironmentFile=/etc/default/valheim
WorkingDirectory=/home/valheimuser
ExecStartPre=/usr/games/steamcmd +login anonymous +force_install_dir /home/valheimuser/valheimserver +app_update 896660 validate +exit
ExecStart=/home/valheimuser/valheimserver/valheim_server.x86_64 -name "${name}" -port ${port} -world "${world}" -password "${password}"

[Install]
WantedBy=multi-user.target
Create the environment file with the desired options: /etc/default/valheim
templdpath=$LD_LIBRARY_PATH
LD_LIBRARY_PATH=/home/valheimuser/valheimserver/linux64:$LD_LIBRARY_PATH
SteamAppId=892970
password=sekratt
port=3456
name=ValheimDedicatedServer101
world=valinor
Reload systemd
sudo systemctl daemon-reloadAt this point, the service is loaded – but is not running and will not start automatically on boot.
sudo systemctl status valheim
4. Start the Valheim systemd service
(Optional) Watch the logs during first startup in a separate terminal window.
journalctl -u valheim -fStart the newly installed valheim service. The initial startup may take a few minutes. The ExecStartPre declaration in the valheim.service file runs the steamcmd command to download the game server files before starting the dedicated server binary. The command prompt will return once the ExecStartPre command has completed running.
sudo systemctl start valheimImmediately, the service will log the service start execution.
Starting Valheim Dedicated Server…The following log message indicates the has been installed under the user’s home directory and the ExecStartPre command is finished.
Success! App '896660' fully installed.The dedicated server execution under the ExecStart declaration will log the following message when startup is complete.
Game server connected5. Check Valheim service status
sudo systemctl status valheim
6. Automatically start the dedicated server on system boot
Enable the service so it automatically starts on boot.
sudo systemctl enable valheimCreated symlink /etc/systemd/system/multi-user.target.wants/valheim.service → /etc/systemd/system/valheim.service.Configure Valheim Linux Dedicated Server with Crossplay
To proceed, it is presumed all of the steps from the instructions to Install Valheim Linux Dedicated Server on Ubuntu 22.04 have been completed and the service is running.
Stop the service
sudo systemctl stop valheimEnsure the required packages are installed. This ought to already be satisfied from the initial dedicated server installation steps.
sudo apt install -y libpulse0 libpulse-dev libatomic1 libc6Update the /etc/systemd/system/valheim.service file to include the -crossplay option in the ExecStart declaration.
ExecStart=/home/valheimuser/valheimserver/valheim_server.x86_64 -name "${name}" -port ${port} -world "${world}" -password "${password}" -crossplayReload systemd
sudo systemctl daemon-reloadStart the service
sudo systemctl start valheimA successful connection to PlayFab will be logged.
Joined PlayFab Party network with ID "xxxxxxxxxxxxxxxxxxx"
Created PlayFab lobby with ID "yyyyyyyyyyyyyyyyyyyyyyyyy", ConnectionString "ccccccccccccccccccccccccc"
Session "ValheimDedicatedServer101" registered with join code 123456
Retry join-code check 99
Session "ValheimDedicatedServer101" with join code 123456 and IP xxx.xxx.xxx.xxx:2456 is active with 0 player(s)
IMPORTANT NOTES when Crossplay is enabled:
– Port forwarding on the router to allow external connections is not required.
– Join IP address connections to the dedicated are not possible (Local area network (LAN) or loopback (lo))
Successful Installation
The Valheim client will be prompted to enter the password for the dedicated server if everything is setup correctly.

It appears playfab no longer works on linux servers, at least as far as I can tell. I cannot find any way to get it to work.
pulseaudio package is required for it!